Although crucial to tile installation, silicone may start peeling away as time passes. Some installers can also apply excess silicone to tiles and therefore ruin the finish, thus leaving you with the unwelcome task of removing silicone. So, what are some of the ways to remove silicone from tiles?
Here’s how you can remove silicone from tiles:
- Determine the problematic tiles.
- Clean the tiles.
- Slide a razor down the caulk seam.
- Hold and pull the exposed edge of the silicone sealant.
- Scrape out the leftovers.
- Scrub the tiles to remove silicone residue.
Read on for more information on the steps to observe when attempting to remove silicone from tiles.
1. Determine the Problematic Tiles
The first step should always be determining the tiles that need attention. This should help you know some of the items you’ll need to use. Even more importantly, having a rough idea of all the tiles that need attention will help you know whether or not you’ll need to remove shower accessories or countertop devices.
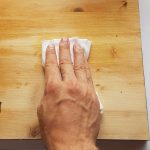
2. Clean the Tiles
After you’ve cleared the work area, next is to wash the tiles using a quality tile cleaner that doesn’t leave a residue like the Better Life Tub & Tile Cleaner, which you can find on Amazon. Although not mandatory, hot water can also help clean the tile, thereby eliminating the need to clean the surface later.
Pro Tip: Cleaning the tiles before removal makes resealing easier and quicker. Some people tend to skip the all-important step of cleaning the tiles before removing silicone. Although cleaning the tiles won’t help in the silicone removal process, it is crucial in preparing the tile for a resealing procedure because silicone won’t seal well on dirty, grimy, or greasy surfaces.
3. Slide a Razor Down the Caulk Seam
Using a razor or a utility knife, make a precise incision on the caulk seam. As a rule, you should ensure the knife cuts through the base of the caulk, which will allow you to loosen the seam. The trick is to use the tip of the utility knife to make shallow cuts on the edge of the silicone seam.
You might need to repeat the process on both sides of the seam to make the edge loose and easy to pull out. And while you should aim to slice the lower parts of the silicone sealant, cutting extra deeply might make the silicone removal process a lot harder.
Therefore, aim to cut towards the bottom of the sealant as it’ll make it easier to peel up the silicone-like a banana.
Pro Tip: Be gentle when sliding a razor down the caulk seam to avoid damaging the tiles. Although the intention is to remove silicone from the stained tiles, applying too much pressure with a utility knife might end up scratching the tile instead. As a result, you should aim to slide just the tip of the knife and target the bottom of the silicone seam instead of the surface of the tile.
4. Hold and Pull the Exposed Edge of the Silicone Sealant
After you’re done slicing the silicon seam and have the edge well exposed, next is to peel the silicone up. Ideally, you shouldn’t peel with too much force as the silicone might be brittle and end up cut in half. Peeling the silicone carefully will allow you to remove the part you can see along with the silicone that filled the joint.
If you encounter difficulty peeling the silicone from the tile, you can use your utility knife to further weaken the bond. And although it might be tempting to slice the inner parts of the silicone, try to cut just above the tile surface to make it easy to pull the remaining silicone.
5. Scrape Out the Leftovers
Once done with the easy-to-remove silicone, next is to work on the leftover pieces stuck on the tile surface. You’ll need a putty knife or ice scraper to remove the stuck silicone. However, be careful not to use excessive force as you can easily damage the tile.
Start by positioning the knife at a slanting angle and carefully dig out the leftovers. It is important to scratch gently and switch between devices if you have to. Using a quality putty knife like the Dekeones 4 Pack Putty Knife Scraper can help you scrape through affected tiles without ruining or scratching the surface.
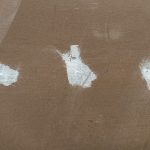
6. Scrub the Tiles To Remove Silicone Residue
If you plan to use the tile again, then you’ll need to clean it nicely before adding another sealant. Take an abrasive scouring pad and wet it with acetone, rubbing alcohol, or mineral spirits to clean the surface. When cleaning, wipe gently over the tile, adding a bit of pressure, especially when removing stubborn residue.
You can also use a bleach and water mixture to eliminate mold and mildew. However, you should allow the tile to dry off before adding another sealant.
Pro Tip: Use a scratch-free scouring pad to prevent damaging the tiles. After you’re done removing the silicone from the affected tiles, the next step should be scrubbing them with a scratch-free scouring pad dipped in an alcohol, acetone, or mineral spirits solution. Scratch-free scouring pads help maintain the tiles’ appearance while still removing the silicone residue.
You can also use elbow grease to remove the tougher residue and leave your tile(s) looking good as new.
Removing Silicone From Tiles Using Solvents
The Bilsong Silicone Caulking Tools will help you remove silicone from tiles, but to make the job even easier you can spray the unwanted caulk with solvents. A solvent can soften and loosen silicone so you can scrape it off without damaging the tile.
Below are steps to observe if you choose to remove silicone using solvents:
1. Clean the Tile To Remove Dirt and Any Residue
If your plan is to reapply silicone to the affected tile (s), then it’s highly advisable to deep clean the tile to remove surface grime and soap scum that can inhibit the new caulk’s adhering ability. Therefore, before introducing your preferred solvent, it’s best to ensure the tile is clean and free of surface dirt. You should also give the tile enough time to dry before proceeding to the next step.
2. Apply Your Preferred Solvent
Take your preferred solvent and apply it generously to the target tiles. As a good rule of thumb, you should follow the instructions indicated on the product. Orange-Sol De-Sovl-It, is a heavy-duty benzene-free degreaser that also works for cleaning up wet paint and roofing tar.
Though it is more often used for oiling hinges, WD40 Multipurpose Lubricant can also be used to remove silicone from tiles and other surfaces. WD40 works by breaking the chemical bonds that hold the silicone to the tile, making it easier to remove.
3. Allow the Solvent To Dry
Again, the amount of time you allow the solvent should depend on the product instructions. Some solvents manufacturers recommend giving the solvent 2-4 hours to work, while solvents like WD-40 tend to work fast on silicone caulk.
You can also gauge whether the silicone is ready to remove by touching the surface with a utility knife. If the silicone starts coming off, then you should proceed to the next step.
4. Loosen the Sealant Using a Utility Knife or Putty Knife
This step should be fairly straightforward, especially if you previously allowed the solvent enough time to weaken the silicone bonds. Target the edges first, ensuring you make them loose enough such that they can be pulled with ease. Instead of scraping the silicone from the bottom of the tile, aim to make it weaker to make it easier to pull.
5. Peel the Silicone off the Tiles
Peeling off the silicone should be a breeze if you observe the previous steps to the latter. Grasp and peel the silicone gently off the tiles, observing how it comes off. You might need to spray more WD-40 Multi-Use (or your preferred solvent) if the silicone is proving too hard to remove.
Please note that you might need to use a utility knife to remove the stubborn silicone that’s hard to remove. However, you’ll have a much easier time removing solvent-sprayed silicone than when removing it without the assistance of a solvent. Remember to use the putty knife or utility knife gently to avoid scratching and damaging the tile (s).
6. Clean the Solvent and Silicone Residue
You’ll need to clean the solvent and silicone residues from the surface of the tiles. And since most silicone-removing solvents will contain potentially harmful chemicals, it is crucial to remove the residues using methylated spirit or alcohol-based solutions. Finally, allow the tiles to dry up before applying a new sealant to the tiles.
Wrapping Up
Luckily, removing silicone from tiles doesn’t require professional assistance as it’s a relatively easy DIY project. However, for successful outcomes, it’s best to prep the tiles by cleaning the surfaces. You should also use sharp knives or blades to cut and loosen the silicone edges.
After you’re done removing silicone from the tiles, remember to clean up the residues with a strong alcohol, acetone, or spirit solution. As a rule, it is crucial to use knives or blades with sharp tips as blunt ones will require additional force, which can end up scratching or damaging the tiles.